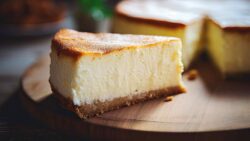
Pierogi – Polish dumplings | RecipeTin Eats
Pierogi Ruskies: Potatoes. Cheese. Butter. The Polish are genius – this is dumpling heaven! Easier to wrap than Asian dumplings because there’s no fancy pleating involved. Great weekend project – cook some now, freeze some for later. They cook from frozen!!
A Pierogi Ruskies recipe
I’m so excited to be bringing you this Pierogi recipe! I’d eat them every day if they didn’t tip the scales in the wrong direction. 😭
Even if you haven’t tried a Pierogi before, all you need to know is that they are cheesy, creamy mashed potato filled dumplings served with an intensely butter onion sauce.
In other words, it is every Cheese Lovin’ Carb Monsters’ Dream come true, and she who is the self appointed Head Priestess of this Club is literally in mind-boggling-ecstasy when faced with a plate of these.
They are, to say the least, one of the most delicious things I’ve eaten this year!
What are Pierogis?
Pierogis are eastern European stuffed dumplings that are boiled. As with many traditional foods, there are regional varieties with fillings ranging from sweet to savoury, meat and no meat.
This potato cheese filled Pierogi recipe I’m sharing today is a popular variety from Poland. I mean, cheese! Potato! Butter! Even if you’ve never had one before, you know you’re going to love it!
What they taste like – Pierogis are heartier and richer than Asian dumplings like gyoza and Chinese potstickers. The dumpling wrapper is thicker, the filling is richer, the dumpling itself is bigger and heavier, and the sauce is mainly butter. Perhaps not the lightest meal but it will be one of the best things you eat this month!!
Ingredients in Pierogi
Not very many! Cheese. Butter. Potato. Flour!
THE Pierogi filling
It’s cheesy, buttery, creamy mashed potato!
Potatoes – Use all-rounder potatoes so they mash up fluffy and creamy. The most common potatoes at regular stores will be fine – they’re stocked because they’re great all-rounders.
Australia – Sebago (the dirt brushed potatoes sold everywhere) are perfect, Desiree are great too. US: Yukon Gold, russet, UK: Maris piper, King Edward.
Cheese – I use cheddar but any good melting cheese you’d happily put in your grilled cheese is fine. Give mozzarella a miss. While it melts great, it doesn’t have enough flavour.
Authenticity note – Pierogi is traditionally made with quark which is a European fresh cheese, not something I’ve seen in Australia. Shredded cheese, as you can imagine, is a delicious alternative. Cottage cheese or sour cream also work (and more similar to quark).
Butter – Use unsalted so we can add the right amount of salt.
Pierogi DUMPLING DOUGH
Flour – Just plain / all-purpose flour.
Large egg – From a carton labelled “large eggs” (they should weight around 55-60g/2 oz).
Butter – Melted into the water that I accidentally left out of the phot. 🙂
ONION BUTTER SAUCE
You could serve the Pierogis will just melted butter and you’d swoon. But it’s even better with a sautéed onion sauce which is common with traditional Polish Pierogis.
How to make Pierogi
Pierogis are easier to wrap than gyoza and potstickers. Because Asians like pleating – which can take practice to master. The Polish just press to seal. I’m a big fan! 🙂
HOT TIP: Got a Pierogi itch that needs catching but homemade wrappers are out of reach? Use store-bought round Asian dumpling wrappers instead. The wrappers are finer but it works a treat!
1. CHEESY POTATO FILLING FIRST
Make the filling first because it needs 1 1/2 hours to fully cool, during which time you’ll have the dough rolled out and cut, ready to fill!
Boil potatoes in salted water, starting with the potatoes in cold water. Why? Because otherwise the outside of the potatoes cook too much and start to crumble before the inside is cooked.
Drain potatoes.
Mash & mix – Pass the potatoes through a potato ricer or mash using a regular potato masher. Then mix in the butter, cheese, salt and pepper. The cheese won’t melt – it melts when the pierogis is boiled!
Cool – Spread out onto a tra. Cover with cling wrap, pressing so it is fully in contact, so the filling doesn’t sweat. Cool on the counter (about 30 minutes) then refrigerate until cold (1 hour+). You can do this the day before.
The filling needs to be cold so it doesn’t sweat inside the dough (which would make the dough soggy). It’s also easier to wrap the dumplings because the potato is firm.
2. how to make pierogi dumpling DOUGH
You could use your stand-mixer but I enjoy the leisurely process of hand-kneading this dough. It’s easy to manage because it’s a small amount and the dough is soft. Plus, hand-kneading is somewhat satisfying, and you can (smugly) tell everybody fortunate enough to eat one of these – I made these myself with my own hands. (You know I do!)
Dry – Whisk the flour and salt in a mixing bowl.
Add wet – Make a well in the centre. Then add melted butter with warm water plus the egg. Mix to combine using a spatula – it will be a rough, shaggy dough.
Knead – Scrape out onto a lightly floured work surface. Knead for 5 minutes until the dough becomes smooth. Use the bare minimum flour as needed to prevent it from sticking to your hands and the work surface. (Too much flour = drier stiffer dough = more difficult to roll out thinly).
Rest – Wrap with cling wrap and leave on the counter for 30 minutes.
3. MAKING THE PIEROGIS
Roll out the dough on a lightly floured surface to 3mm / 1/8″ thickness.
Cut out rounds using a 9 cm / 3″ cutter. Do as many as you can, then gather surplus dough into a ball, wrap with cling wrap and set aside to roll out and cut more later.
Filling – Place 1 tablespoon of cheesy potato filling in the middle of a round (20g, if you want to be exact!).
Dip finger with water and run along edge of half the circle. This will help seal securely.
Fold dough over to enclose the filling then press the edges together.
Seal firmly by pinching to make slight dents, the traditional look of pierogis.
Place them on a lightly floured tray and continue to wrap remaining Pierogi (including rolling out the remaining dough). You should get ~30 pierogis. A nice big batch – cook some now, freeze some for later!
4. HOW TO COOK PIEROGIS
Boil like pasta! Just make sure you don’t crowd the pot. Pierogis needs space to bounce around! I cook 8 in a medium pot, and up to 12 in a wider pot. Tips below for batching cooking larger quantities.
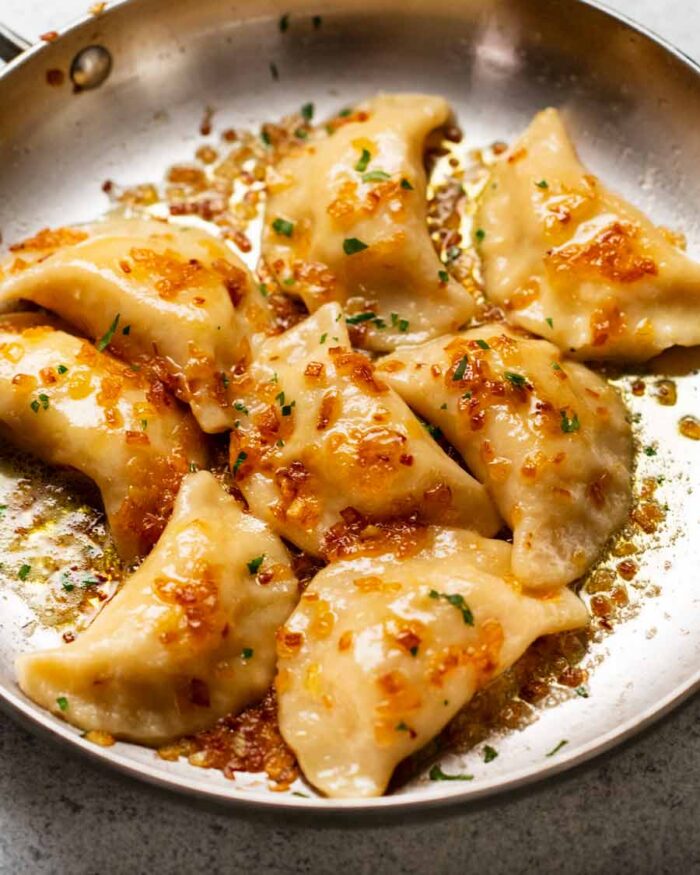
Sauté onion first – Sauté chopped onion in butter until golden on the edges. Then transfer into a bowl or container and use as much or as little as you want for whatever size serving of pierogis you are making. 1 large onion is enough for 30 pierogis because they are only sparingly scattered with onion, like pictured. Cook onion will keep for 5 days in the fridge, or freezer for 3 months.
Boil 5 minutes – Bring ~3 litres/quarts of water to the boil with 1 tablespoon of salt. Lower 10 pierogis into the water and cook for 5 minutes, or until they are floating on the surface (they sink at first).
⚠️ As noted above the step photos, don’t crowd the pot else the pierogis will stick together and cook unevenly.
⚡️ It’s important to use salted water so you get some seasoning into the pierogis wrapper as it cooks. Makes it tastier!
Reserve water – Dip a jug into the water and scoop out 1 cup water. We’re going to use a bit of this water to make the sauce. The cooking water is better than tap water because it’s got starch from the pierogi dough in it which makes the sauce thicken. If you just mixed water + butter together, it stays water.
Scoop out or drain – Then use a slotted spoon to transfer pierogi into a bowl. Or, you can drain in a colander if you are not using the water to cook more.
Butter sauce – Using a largish pan, melt 25g butter (1 1/2 tablespoons) over medium heat. Add 1/3 of the onion butter (from step 1) plus the cooked pierogis with 2 tablespoons of the reserved cooking water.
Toss for 1 minute, still on the stove, until the pierogis are coated in the butter sauce. You’ll see it goes from watery (when you first add the water) to thickened so it sticks to the surface of the pierogi.
Larger batch – Just scale up the butter, onion and water. At this stage, it’s easy to eye-ball it. And I wouldn’t discourage the use of even more butter!
Serve – Slide onto a serving plate, scraping out every drop of butter. Sprinkle with parsley, add a dollop of sour cream. Eat and be happy!
Big-batch cooking pierogi
As strange as it sounds to have a whole section of how to cook and serve larger batches of pierogi, there’s actually practical factors that come into play that need to be considered! The reason is because they are quite large – bigger than Gyoza and Chinese dumplings, you can’t boil more than 10 to 12 max per batch, and they need to be tossed in the sauce on the stove.
So the recipe I’m sharing today makes 30 pierogis but provides directions to cook one batch of 8 to 10 (which is a nice amount for 2 people). Leftovers are perfect for freezing – you can cook from frozen!
But if you would like to cook all 30 pierogis, here’s some practical tips for how to do it!
boiling large batches
Pierogis need to be boiled in a single layer else they can get stuck together and the wrapping won’t cook evenly. So you’ll max out at around 12 pierogis in a large home-pot.
If you want to make and serve more, then boil in batches of 12 and spread cooked pierogis on a tray. Once you’ve boiled as much as you want, then drop all of them back into the pot for 30 seconds to reheat before tossing with the butter. Reserve a mugful of the cooking water then drain in a colander.
Large batch butter sauce tossing
For the butter sauce tossing part, you can put in as many pierogis as you can comfortably fit into a large skillet. You could even use a large pot. Just make sure you can toss the pierogis, because that’s how you get a nice coating of butter on them.
Simple method for gigantic batches
If you want to serve all 30 pierogis at the same time, an easy way to sauce them up is to make the sauce separately then douse over the pierogis.
To do this, cook the pierogis per above (ie boil then reheat). Drain well in a colander and transfer into a serving bowl. Melt 70g / 4 1/2 tbsp unsalted butter with 1/3 cup of the cooking water in a small pan on medium heat. Simmer for a couple of minutes until the butter thickens (the starch in the pierogi cooking water makes this happen).
Serving pierogis
Cooking part done, it’s time to enjoy them! A dollop of sour cream adds a lovely cooling, tangy creamy touch that pairs so well with cheesy mashed potato (proof – reader favourite Stuffed Baked Potatoes!). And a little sprinkle of parsley or chives adds a nice touch of green to an otherwise very beige plate.
And as a plate of food that is an unapologetic celebration of three of my favourite food groups – butter, cheese and potato – a perky fresh side of greens would be a nice accompaniment. Even this self-confessed Cheese Lovin’ Carb Monster needs something fresh to cut through all that richness! Try a classic light vinaigrette with leafy greens or any steamed vegetables.
Hope you love this as much as we do! Big shout out to our Chef JB for doing much of the leg-work on the research, development and testing on this pierogi recipe, then teaching me and answering my many, many questions. It’s been raining pierogis in our kitchen!!! – Nagi x
Watch how to make it
Hungry for more? Subscribe to my newsletter and follow along on Facebook, Pinterest and Instagram for all of the latest updates.
Pierogi Ruskies – Polish Dumplings
Prep: 45 minutes
Cook: 40 minutes
Resting dough: 30 minutes
Total: 1 hour 55 minutes
Mains
European, polish
Servings30 pierogis
Tap or hover to scale
Instructions
Filling:
Boil potatoes – Put potato and 1 tbsp salt in a large saucepan. Add cold tap water so it’s 3cm/1 inch above potatoes. Bring to a boil on high heat then reduce heat to medium high and simmer for 15 minutes or until potatoes are soft.
Mash – Drain, then pass the potatoes through a potato ricer into a bowl (or use potato masher)
Cheese it – Immediately add butter, cheese, salt and pepper. Mix with a wooden spoon until fully combined.
Cool – Spread out ~1cm / 1/2″ thick on a tray. Cover with cling wrap, pressing so it is fully in contact. Cool on the counter (~30 min) then refrigerate until cold (1 hour+).
Pierogi Dough:
Melt butter – Heat up the water and butter in a small saucepan over medium heat just until butter is melted, do not boil water. (Or do this in the microwave). Turn off heat.
Mix dough – Whisk the flour and salt in a mixing bowl. Make a well in the centre and then add the butter water plus egg. Mix to combine into a shaggy dough.
Knead – Scrape out onto a lightly floured work surface. Knead for 5 minutes until the dough becomes smooth (Note 3). You could also use your stand mixer.
Rest – Wrap with cling wrap and leave on the counter for 30 minutes.
Wrapping pierogis:
Roll & cut – On a lightly floured surface, roll out the dough to 3mm / 1/8″ thickness. Cut out rounds using a 9 cm / 3″ cutter. Do as many as you can, then gather surplus dough into a ball, wrap with cling wrap and set aside for later.
Fill & wrap – Place 1 tablespoon of cheesy potato filling in the middle of a round. Dip finger with water and run along edge of half the circle. Fold dough over to enclose the filling and press to seal, making slight indents (no pleats).
Wrap remaining – Place them on a lightly floured tray and continue to wrap remaining Pierogi (including rolling out the remaining dough). You should get ~30 pierogis.
Onion butter sauce:
In a non stick skillet, melt the butter until foamy over medium heat. Add onion and salt, then cook, stirring regularly, for 10 to 15 minutes until golden on the edges. Scrape out into a bowl, then set aside (OK to cool).
Cooking & serving pierogis:
Batch cooking – Directions below are for cooking and serving 10. Boil pierogis in batches of 10 to 12 max, they need space to bounce around in the water, and you need space to toss them in the butter. (Note 4 for big batch cooking)
Boil 5 minutes – Bring ~3 litres/quarts of water to the boil with 1 tbsp salt. Lower 10 piergosi into the water. Cook for 5 minutes – they should be floating on the surface.
Reserve water & drain – Dip a jug into the water and scoop out ~1 cup water. Then use a slotted spoon to transfer pierogi into a bowl (or drain, if not cooking more).
Butter sauce – Melt butter in a large skillet over medium heat. Add 1/3 of the onion butter plus the cooked pierogis with 2 tablespoons of the reserved cooking water. Toss for 1 minute, still on the stove, until the pierogis are coated in the butter. (Note 4 on scaling up)
Serve – Slide onto a serving plate, scraping out every drop of butter. Sprinkle with parsley, add a dollop of sour cream. Eat and be happy!
Recipe Notes:
Serving size – 4 to 5 pierogis with a side salad makes a nice meal. They are pretty rich, actually, being solely comprised of potato, cheese and butter!
1. Potatoes – Use your favourite mashing potatoes. All-rounder and floury / starchy potatoes are best. The most common potatoes stocked at regular stores should be good all-rounders.
Australia – Sebago (common dirt brushed potatoes), Desiree. US: Yukon Gold, russet, UK: Maris piper, King Edward.
2. Cheese – Traditionally made with quark which is an European fresh cheese which isn’t something I’ve seen in Australia. Shredded cheese, as you can imagine, is a delicious alternative. Cottage cheese or sour cream also work (and more similar to quark).
I use cheddar but any good melting cheese you’d happily put in your grilled cheese is fine (tasty, gruyere, Colby). Give mozzarella a miss – doesn’t have enough flavour for this recipe.
3. Kneading – When you first mix the dough in the bowl and form into a ball, the surface is rough and shaggy. It is kneaded enough when the surface of the dough ball is smooth. See video at X.
4. Batch cooking – Don’t boil more than 10 – 12 pierogis max in a large pot because they need room to bounce around. To cook lots, boil 10 – 12 at a time, scoop out and spread on a tray. Boil the next batch. Then just before serving, put them all back into the boiling water for 30 seconds to warm them back up. Drain, then toss in the butter sauce with a splash of the reserved cooking water.
Butter amount – You’ll need around 1 1/2 tbsp / 25g plus 2 tablespoons of the cooking water for 8 to 10 pierogis. For all 30, you’ll need around 70g / 4 1/2 tbsp butter and 1/3 cup water. You can eyeball it. Butter is not an exact science here!
5. Make ahead – Pierogis freeze 100% perfectly and can be boiled from frozen! Just add an extra 1 – 2 minutes to the cook time. Freeze in single layers in an airtight container. To save space, you can freeze them on a tray then bundle them into an airtight container.
Life of Dozer
Coming to you in real time! This is Dozer today, at a photography studio for a Christmas special edition of Good Food Australia with the A-team: Rob Palmer (photographer), Emma Knowles (food stylist), Theresa Klein (photo chef). Who ever imaged a discount dog would experience such things!!