Cut your own beef tenderloin – it’s so much cheaper
If you buy a whole beef tenderloin (eye fillet) and trim and cut it yourself, you can save 60-70%+ on cost compared to buying a centre cut tenderloin from the butcher. This is a handy how-to post that accompanies the Roast Beef Tenderoin recipe I also published today.
Introduction
Beef tenderloin is a premium cut of beef, prized for how tender it is. If you buy a nice big centre-cut piece for roasting from a good quality butcher, you pay for the labour involved in trimming and preparing the beef, upwards of $90/kg ($45/lb). But you can save quite a lot by purchasing a whole untrimmed beef tenderloin. The untrimmed whole tenderloin pictured in this post is $36/kg full price ($18/lb) but is regularly on special at $20/kg (it’s from Harris Farms, a chain fresh produce store in Sydney.
So in this post, I’m walking through how to trim and cut a whole beef tenderloin to prepare it for roasting so you can make THIS! ⬇️⬇️⬇️
SIZE and yield
You need a 2.25-2.5kg (4.5 – 5lb) whole beef tenderloin to get a 1kg/2lb centre-cut that is called for in the Roast Beef Tenderloin recipe. If yours is smaller (anything less than ~1.5kg/3lb), the alternative is to roast the whole thing rather than just the centre cut. Tuck the thin tail end under and tie at 2.5cm/1″ intervals. GOAL: Shape it even thickness.
Side note: I was really surprised how good economical beef tenderloin is! By putting in a little preparation time, you can enjoy a beautiful roast beef tenderloin for a fraction of the cost!
1. The whole beef tenderloin
This is what a whole beef tenderloin looks like. The thin end is like a tail, and the thick end has big flappy bits on the sides (yes, this is the professional terminology I use throughout this post).
The tenderloin pictured weighs 1.8 kg (3.5lb) and has been trimmed of excess fat (sometimes they come with a layer of fat covering the whole piece). But it still has the silver skin on it, which is the thin transparent layer than looks silver (hence the name), which we remove in step 2.
Economical whole beef tenderloin is typically sold in vac packs because it extends the shelf life which means it can be sold at a better price. It will be wet and slippery, so dry it off with paper towels so it’s easier to handle.
2. Removing the silver skin
The first thing I do is remove the silver skin. This thin membrane goes tough when cooked, and it also shrinks which wraps the shape of the beef.
To remove the silver skin, just slide a small sharp knife under the silver skin. Then hold the skin up at a 45 degree angle with your left hand to hold it taut, then slide the knife towards the left underneath the silver skin. Keep the knife at a 45 degree angle to remove as little meat as possible.
Work in small sections about 1.25cm / 1/2″ wide at a time, for better control.
Keep going until all the silver skin is removed, and don’t forget to get the bits between the crevices of the flappy bits at the thick end!
3. Tidy the surface
Tidy the surface, removing scruffy little bits and making it as smooth as possible, as pictured above. But minimise the beef you trim off as much as possible!
4. The centre cut for roasting
The best part for roasting is the thick middle part which is called the centre cut. It’s the most desirable because it’s the widest part (we like our roasts hefty!) and it’s even in shape which means the meat cooks evenly.
In contrast, the tail end is not ideal for roasting (without folding and tying) because the thin end will cook much faster than the wider part.
The photo above shows the centre cut of the tenderloin. The goal is just to get the widest part in the centre that’s relatively even thickness.
You can go a little further up the thicker end to get a larger piece, between the big flappy ends (trim them off, to keep the roast neat).
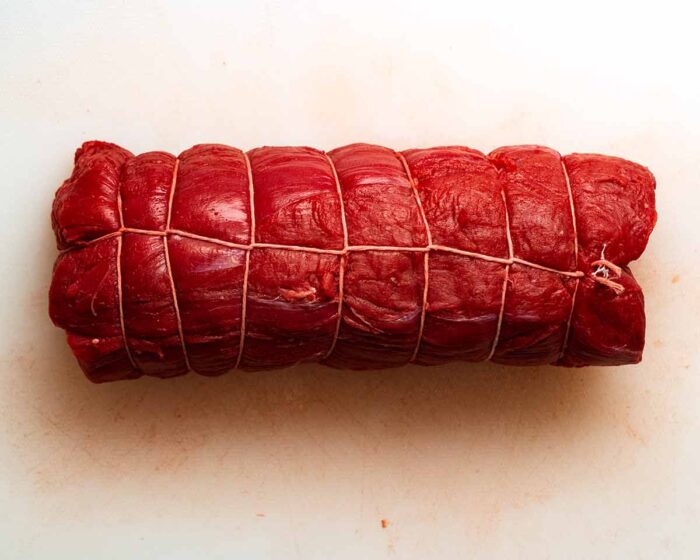
5. tying the roast
If you buy a centre-cut from a good butcher, it will come tied. It’s best to tie because it holds the meat together as it roasts so it keeps a nice shape and holds everything taut, rather than sort of sagging and flattening.
5. yield
The centre cut will be around 40 – 45% of the total weight of a whole beef tenderloin. So, as an example, I was able to get a 800g / 1.6lb centre cut from the 1.8kg / 3.5lb tenderloin pictured in this post which will feed 3 – 4 people.
It’s a little smaller than the 1kg/2lb weight I typically aim for when making a roast. To get a 1kg/2lb centre-cut, you’d need a 2.25-2.5kg / 4.5 – 5lb whole beef tenderloin.
6. More roasting pieces – thin and flappy end
Though the most desirable and sought-after part of the beef tenderloin is the centre-cut, there is by no means any reason why you can’t use the tail and fat end for roasting too simply by tying them up and making smaller roasts.
In the photo above, I’ve tied up the tail end and make it relatively even thickness by tucking the thin pointy tail under. Though very small at just 300g, it’s still roast-able!
The fat end can also be tied and roasted. I even tie the flappy bits in – it sort of adheres as it roasts so the roast mostly holds together when you remove the string later to slice.
Stir fry the scraps!
Any smaller off cuts are ideal to use for stir fries, so keep them and freeze if necessary! Tenderloin is great for stir fries, like everybody’s favourite Beef & Broccoli stir fry or a classic Beef Stir Fry. Slice thinly, fry up in a hot pan for just 1 1/2 minutes, taken them out (so they don’t overcook). Then stir fry the other vegetables and/or noodles if using, add your sauce then toss the beef back in right at the end.
For those of you familiar with tenderising beef for stir fries – there is no need to do that for tenderloin, it’s so tender! Just be sure not to overcook it (hence why I cook the beef first then add it back in later).
Hope you found this post useful! You really can make substantial cost savings by trimming your own beef tenderloin.
Now – make the Roast Beef Tenderloin with a dreamy creamy mushroom sauce! It’s easy and an absolute stunner, perfect for special occasions. – Nagi x
Life of Dozer
Last year I made the mistake of putting Gingerbread Men decorations on the tree within Dozer reach (I know, what was I thinking? 🤦🏻♀️). This year, I keep catching him snuffling around thinking I’m going to make the same mistake again….